Beginner's Guide to Contact Lenses
Everything you need to know before your first pair, including lens types, prescriptions, fittings, and first-week expectations.
Step-by-step technique for inserting and removing your lenses correctly at home, plus how to troubleshoot the most common first-time difficulties.
Learning to put in and remove contact lenses feels awkward at first — and that is entirely normal. Almost every contact lens wearer remembers the first few attempts taking longer than expected, but with a little practice the steps quickly become a simple, automatic routine. This guide covers the correct technique for inserting and taking out contact lenses safely at home, along with solutions to the most common first-time difficulties. The focus is on technique and hygiene working together — because getting both right is what protects your eyes and makes lenses comfortable to wear.
Avoid hand creams, lotions, or moisturising soaps — these transfer to the lens and cause blurred vision and irritation.
Never let tap water remain on your hands. Dry thoroughly so no moisture transfers to the lens.
Being able to see your eye clearly makes everything easier, especially when you're first learning.
Work over a folded towel placed over the sink drain. If you drop a lens, it lands safely rather than disappearing down the drain.
Never use tap water on your contact lenses or let it remain on your hands when handling them. Tap water can carry Acanthamoeba — a microorganism that causes a rare but serious, vision-threatening corneal infection.1
Place the lens on the tip of your dry index finger and hold it up to eye level. A correctly oriented lens forms a smooth, even bowl shape with edges pointing straight upward.2 If the edges flare outward like the brim of a hat, the lens is inside out.
Edges point straight up, forming a neat cup. The lens will seat comfortably on your eye and stay centred when you blink.
Insert this wayThe edges curve outward like a hat brim. Won't damage your eye, but will feel uncomfortable and give blurred vision. Flip it and try again.
Do not insert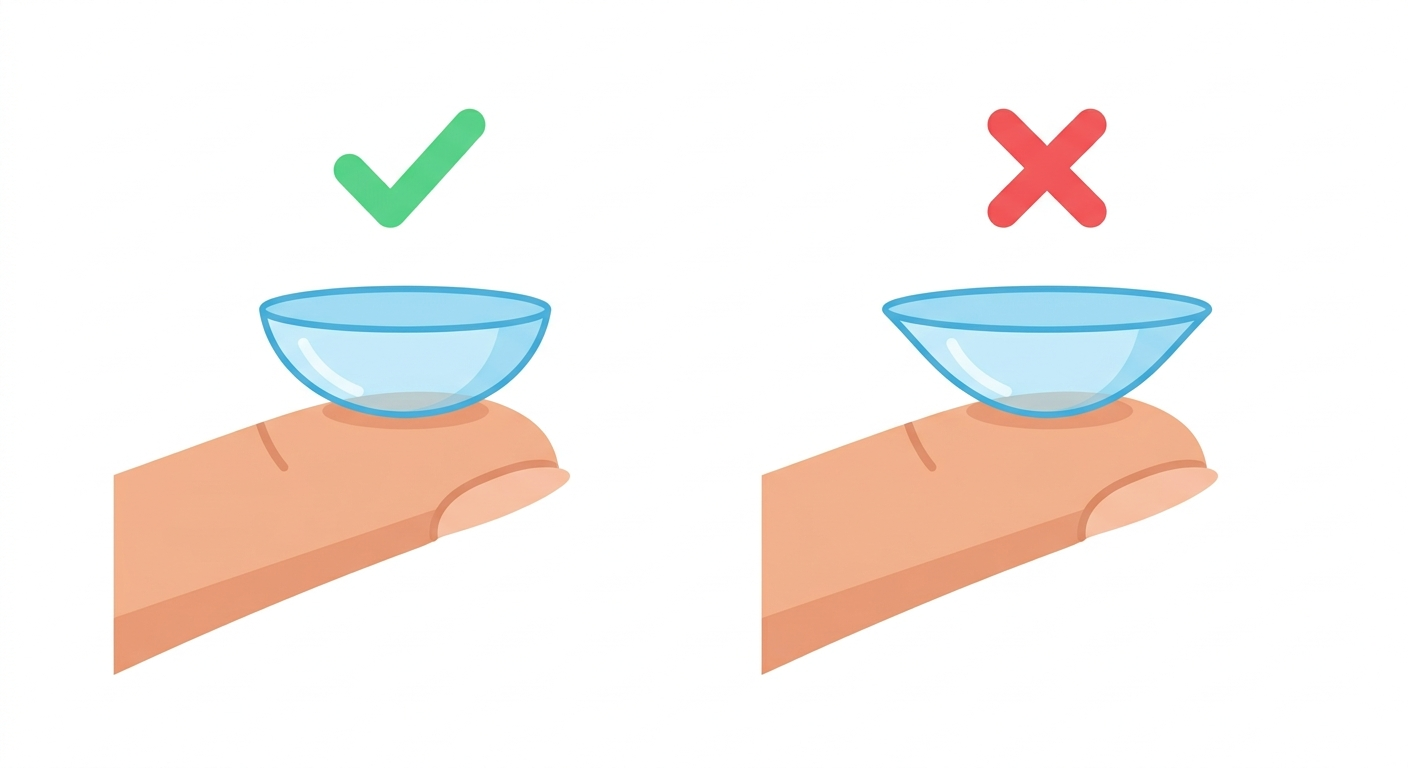
To insert contact lenses safely, keep your eyelids held wide open and bring the lens gently to the centre of your eye without pressing. The moisture of the eye draws the lens in naturally — you do not need to force it.
Most wearers use the right eye first. This prevents mixing up left and right prescriptions, especially if your eyes have different powers.
Ensure the lens is correctly oriented — smooth bowl shape, edges pointing up. Your fingertip should be dry so the lens sits flat and doesn't slide.
Use the middle finger of your dominant hand to pull your lower eyelid firmly downward toward your cheekbone.
Reach over with your opposite hand and use your index or middle finger to pull your upper eyelid upward, pinning your eyelashes against your brow bone.
Look straight ahead into the mirror, or very slightly upward. Gently bring the lens to the coloured part of your eye — the moisture will draw it in. You do not need to press.
Release your upper eyelid first, then your lower eyelid. Look downward briefly, then blink slowly a few times. The lens will naturally centre itself over the cornea.
If the lens does not feel comfortable immediately, blink a few times before concluding anything is wrong. Many lenses settle within a few blinks.
To remove contact lenses safely, always slide the lens onto the white of your eye before gently pinching it between your fingertips. Moving the lens off the sensitive cornea first makes the process much more comfortable.
Apply the same hygiene routine as for insertion. This means mild soap, a lint-free towel, and completely dry hands.
Look straight ahead. Use the middle finger of your dominant hand to pull your lower eyelid down.
Place the pad of your index finger gently on the lower edge of the lens, not the centre, which sits over the more sensitive cornea.
Look upward toward the ceiling and slide the lens down onto the white of your eye. This area is far less sensitive than the cornea.
Gently pinch the lens between the pads of your thumb and index finger. This breaks the suction and lifts the lens cleanly away from the eye.
Discard daily disposable lenses immediately. If you wear reusable lenses, place the lens in your clean palm and begin your cleaning routine.
Never use fingernails, tweezers, or any tool to assist removal. This significantly increases the risk of scratching the surface of your eye.1 If a lens feels dry or stuck, apply a few drops of preservative-free rewetting drops, close your eye, and massage the lid gently for 30 seconds before trying again.
If something feels wrong when you insert or remove a lens, stop, reassess, and fix the underlying issue. Never push through discomfort.
Most likely inside out, or there is a small piece of lint trapped underneath. Remove, inspect, rinse with saline or multipurpose solution, check the orientation, and reinsert.
Do not force it. Apply a few drops of preservative-free rewetting drops, close your eye, and massage your eyelid gently for 30 seconds. The lens will rehydrate and loosen.
The most common first-time difficulty. Try pulling your upper and lower lids wider apart, and approach the eye from slightly below rather than straight ahead. This reduces the blink reflex.
Your fingertip is likely too wet. Gently pat it on a dry, lint-free towel and try again. The lens needs enough friction to stay flat and stable during insertion.
Most new wearers become comfortable inserting and removing contact lenses within the first week of daily practice. The first attempts in your optometrist's clinic may take several minutes. This is normal and expected. Within two weeks, the process typically takes under 30 seconds for most people.
No. Daily disposable contact lenses are approved for single-day wear only and must always be removed before sleep. Sleeping in any lens that has not been specifically approved for overnight wear significantly increases the risk of oxygen deprivation and serious eye infection. If you are interested in lenses that can be worn overnight, ask your optometrist specifically about extended-wear silicone hydrogel options.
No. A contact lens cannot get lost behind your eye. A thin, transparent membrane called the conjunctiva lines the inside of your eyelids and connects to the white of your eye, forming a closed barrier that nothing can pass through.2 If a lens slides under your upper eyelid, close your eye and gently massage the lid or apply rewetting drops and blink to bring it back into view.
Always insert your contact lenses before applying makeup or any skincare product. This prevents oils, primers, powders, and makeup particles from transferring from your fingertips onto the lens surface.2 At the end of the day, remove your lenses before washing off your makeup.
Contact lens suitability, replacement schedules, and wear times must always be confirmed by your optometrist based on your individual prescription and eye health.
Ready to get started?
Browse our full range of daily disposable, fortnightly, and monthly contact lenses, with fast Australia-wide delivery.